How to Hang Foam Board Insulation?

Foam board insulation is an excellent way to improve the energy efficiency of your home by reducing heat loss and preventing drafts. Hanging foam board insulation is a straightforward process, but it requires the right tools and techniques to ensure a secure and effective installation. This guide will walk you through the steps to properly hang foam board insulation, including the use of insulation fasteners and a pneumatic nail gun.
Step 1: Gather Your Tools and Materials
Before you begin, gather the necessary tools and materials:
- Foam board insulation
- Measuring tape
- Utility knife or saw
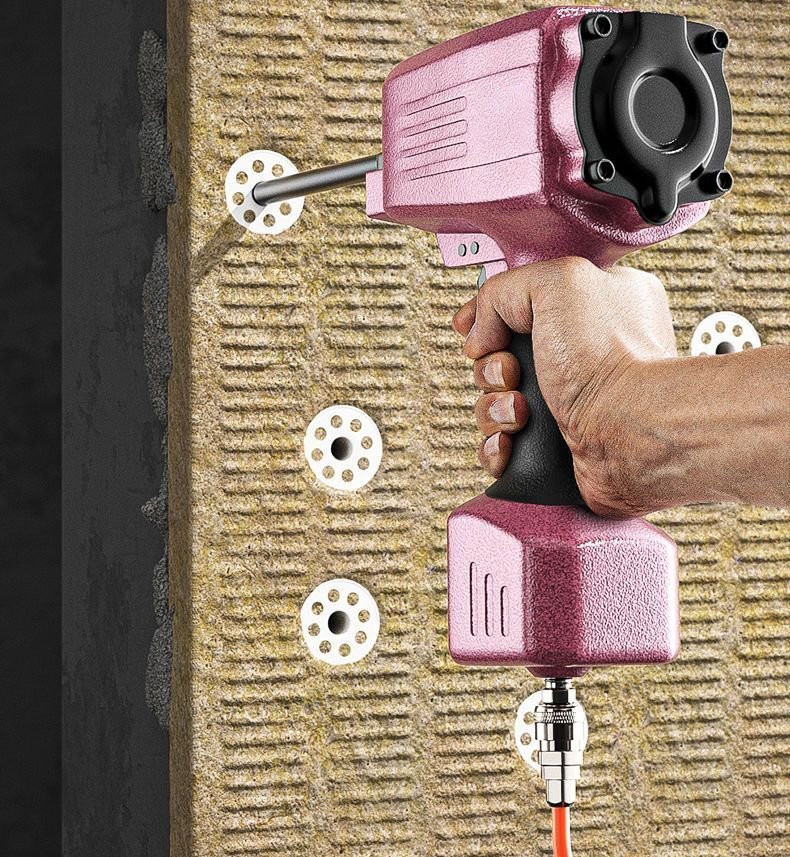
- Insulation fasteners (plastic cap nails or insulation anchors)
- Pneumatic nail gun (or gas-powered nail gun)
- Narrow nails or staples
- Spray foam, caulk, or foil tape for sealing seams
- Ladder (if installing on a ceiling)

Step 2: Measure and Cut the Foam Board
Start by measuring the area where you plan to install the foam board insulation. Use a measuring tape to determine the dimensions, then transfer these measurements to the foam board. Carefully cut the foam board to size using a utility knife or saw. Ensure that your cuts are straight and precise so the boards fit snugly together when installed.
Step 3: Position the Foam Board
Once you have cut the foam board to the appropriate size, position it against the wall, ceiling, or floor where you want to install it. Make sure the board is properly aligned and fits well within the space.
Step 4: Secure with Insulation Fasteners
To secure the foam board in place, use insulation fasteners, also known as plastic cap nails or insulation anchors. These fasteners are designed specifically for securing insulation materials to surfaces. Space the fasteners about 12-16 inches apart around the perimeter of the foam board and in the center. Drive the fasteners through the foam and into the surface behind it, ensuring the board is firmly attached. This step provides a strong initial hold for the insulation.
Step 5: Reinforce with a Pneumatic Nail Gun
For added security, especially on larger or more critical installations, use a pneumatic nail gun or a gas-powered nail gun. Load the nail gun with long, narrow nails or staples, and drive them into the foam board along the edges and at key points across the surface. This additional reinforcement helps to ensure that the foam board remains securely in place over time, even under varying environmental conditions.
Step 6: Seal the Seams
After all the foam boards are in place and secured, it’s important to seal the seams between the boards to prevent air leaks and improve the insulation’s effectiveness. Use spray foam, caulk, or foil tape to seal any gaps or seams between the boards. This will enhance the insulation’s performance by creating a continuous barrier against heat loss.
Step 7: Inspect and Finalize
Finally, inspect the installation to ensure that all foam boards are securely attached and that there are no gaps or loose areas. If necessary, add more fasteners or nails to reinforce any weak spots. Make sure the seams are properly sealed to maximize the insulation’s effectiveness.
Conclusion
By following these steps, including the use of insulation fasteners and a pneumatic nail gun, you can successfully hang foam board insulation. This method ensures a secure and long-lasting installation, providing your home with improved energy efficiency and comfort. Whether you’re working on walls, ceilings, or floors, proper installation of foam board insulation is key to getting the most out of this valuable material.
Reference:Pneumatic Nail Gun Insulation Fasteners